Chrome://net-internals/#dns: Flush DNS Cache on Chrome
chrome.//net-internals/#dns | chrome //net-internals/#dns clear host cache android
Those working in the network field know the saying: “It’s always DNS”. Jokes aside, issues related to network failures mostly point to an out-of-date DNS cache. When a browser is unable to connect to an otherwise functional website, it means that there are some problems with your DNS cache. To fix this you need to flush the DNS cache and the website will start loading.
So if you too are facing connectivity issues, you can follow our tutorial and clear the DNS cache on your Android device. We’ve added several workarounds, including changing the route method and DNS servers. So to clear the DNS cache on Android phones and tablets, follow our guide given below.
What is the DNS cache?
The DNS cache is a temporary database that stores information about previously visited websites. When a user visits a website, the browser stores DNS information in the cache. This helps speed up subsequent visits to the same website because the browser can access the DNS information from the cache rather than having to look it up again.
How to flush the DNS cache on Chrome using the chrome://net-internals/#dns command?
To flush the DNS cache on Chrome, follow these steps:
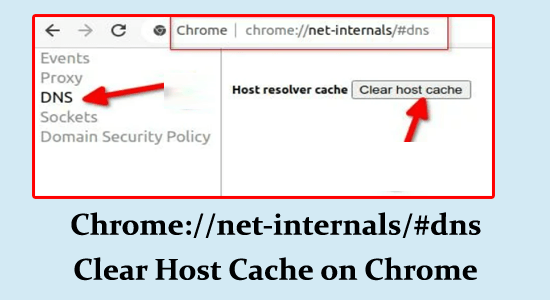
- Open Chrome and type chrome://net-internals/#dns in the address bar. Press Enter.
- This will open the DNS page. Click the “Clear host cache” button.
- As soon as you click the button, the DNS cache will be cleared. You can verify this by checking the “Host Resolver Cache” section. If the cache has been cleared successfully, you should see a message that says “DNS resolver cache cleared successfully.”
- Close and reopen Chrome to make sure the changes take effect.
Clear DNS Cache for Your Android
Android does not provide any direct way to clear the system’s DNS cache within the UI, but you can flush the DNS cache using browsers like Chrome, Firefox, Opera, and Safari as we have shown above.
Just open your mobile phone and open the browser you are using to follow the above steps to clear the DNS cache.
How to Use Chrome://net-internals/#dns Command to Clear DNS Cache on Windows, macOS, Linux?
- Launch Chrome web browser on your OS and type or copy/paste chrome://net-internals/#dns in the address bar. Press Enter.
- Now, click on the Clear Host Cache button.
- Restart Chrome and navigate to the chrome://net-internals/#sockets page to flush the socket pool.
If you cannot clear the DNS cache following the instructions listed, try following the solutions listed below to fix the problem.
What exactly is DNS cache Flushing?
Flushing the DNS cache means getting rid of the existing cached data DNS entries from Google Chrome. Once flushed, Google Chrome will ask for all new IP addresses and DNS information for that website.
Why Do You Need to Clear the DNS Cache in Chrome?
If DNS cache is so important for a faster and more enjoyable internet experience, why do you still need to clear it from your browser?
Although the DNS cache can speed up Internet browsing, it can also cause problems if the stored data becomes outdated or corrupted. Many websites change their IP addresses from time to time, which means you won’t be able to access them if their old IP addresses are still stored in the DNS cache.
Clearing the Chrome DNS cache erases all existing DNS information from temporary storage and forces your computer to obtain fresh data from the DNS servers. You can now open websites that were previously inaccessible due to changes in their IP addresses.
Conclusion
The DNS cache is an important part of Chrome’s browsing experience, but sometimes, it can become corrupted or out of date. In such cases, flushing the DNS cache can help resolve problems browsing the Internet. The chrome://net-internals/#dns command is a simple and effective way to flush the DNS cache on Chrome. If you are facing problems browsing the internet, try this command and see if it helps resolve the issue.